1. no network connection
Find Necessary configuration file in following path
cd /etc/sysconfig/network-scripts/
Name: ifcfg-enp0s3 (maybe.... or other names)
change content:
DNS1=8.8.8.8
DNS2=8.8.4.4
# Note this was set to no
ONBOOT=yes
Then:
service network restart
sudo yum update
sudo yum install net-tools
2. how to use bridge????
2018年10月31日 星期三
2018年4月26日 星期四
Git To GitHub SSH
產生ssh 用來從command line快速登入 github
目的: 本機可以快速登入 github 這樣就不用每次都還要輸入帳密來登入了...
在 Git Bash 或是 Cmder 裡面....
執行 ls -al ~/.ssh
好吧來生成key
執行 ssh-keygen
這樣就會生成key
看key的內容
執行 cat ~/.ssh/id_rsa.pub
準備複製key的內容,貼到 Github... SSH and GPG keys
登入Github後右上方人頭旁間有倒立三角型,按下後選 Setting
左邊選單SSH and GPG keys
會看到右邊綠色按鈕,New SSH Key
把 cat ~/.ssh/id_rsa.pub 查到的內容全部貼上
嘗試登入
ssh -T git@github.com
然後輸入一次帳密,就再也不用輸入囉
Reference:
https://git-scm.com/book/zh-tw/v1/%E4%BC%BA%E6%9C%8D%E5%99%A8%E4%B8%8A%E7%9A%84-Git-%E7%94%9F%E6%88%90-SSH-%E5%85%AC%E9%96%8B%E9%87%91%E9%91%B0
http://trunk-studio.com/blog/ssh-for-windows/
2018年4月25日 星期三
Sublime Text 3 Syntax HTML Missing
Check:
1. View ===> Syntax
2. Click on Right-Bottom Text .....will show the syntax you got
If your syntax does not exist.... html in my case
check your package folder if html.sublime-package exist
if not, just copy it from somewhere.
Then you will have it again!!!!
2018年4月24日 星期二
MongoDB fast tutorial for windows
1. Download Mongodb
2. During installation, uncheck : install MongoDB Compass 因為會卡住
3. Set Path eg: C:\mongodb\bin\ Then you can execute mongo.exe and mongod.exe
4. Set up a MongoDB data folder. eg: C:\mongodata\
5. In the cmd, execute: mongod --dbpath C:\mongodata\ 啟動mongodb 這樣畫面不關就是啟動
6. New a batch file: execute : mongo 127.0.0.1:27017/admin 用管理員權限登入 mongoDB
7. Execute this batch. you can get in mongodb
可以在batch檔加入:
mongod --dbpath C:\mongodata\ 啟動資料庫與指定位置
mongo 127.0.0.1:27017/admin 進入互動介面
2018年4月11日 星期三
Intellij Idea 常用小技巧 快捷 shortcut trick
@Java 生成 main 方法:
psvm
@Mastering IntelliJ IDEA keyboard shortcuts
https://www.jetbrains.com/help/idea/mastering-keyboard-shortcuts.html
2018年3月18日 星期日
Laravel Composer Windows PhpStorm
OS: Win 10
Server: nginx
Php Version: Php 7.2.3
Composer: Laravel Management Program
Composer 安裝套件先安裝
Laravel 安裝與設定方法
建立專案 如果專案名空白就預設laravel 下面專案名是 wow
composer create-project laravel/laravel wow --prefer-dist
下載Xdebug 要對應php的版本
下載
參考說明
在 php.ini 最下面加入以下設定 注意 如果資料夾名稱有 () 將會導致錯誤
=============================
[Xdebug]
zend_extension=C:/code/nginx/php_xdebug-2.6.0-7.2-vc15-nts-x86_64.dll
xdebug.remote_enable=1
xdebug.remote_host=localhost
xdebug.remote_port=9000
=============================
在.../Php/中執行
php -v
C:\Program Files (x86)\PHP
$ php -v
PHP 7.2.3 (cli) (built: Feb 28 2018 05:48:02) ( NTS MSVC15 (Visual C++ 2017) x64 )
Copyright (c) 1997-2018 The PHP Group
Zend Engine v3.2.0, Copyright (c) 1998-2018 Zend Technologies
with Xdebug v2.6.0, Copyright (c) 2002-2018, by Derick Rethans
另外一種建立專案方法:
使用PhpStorm
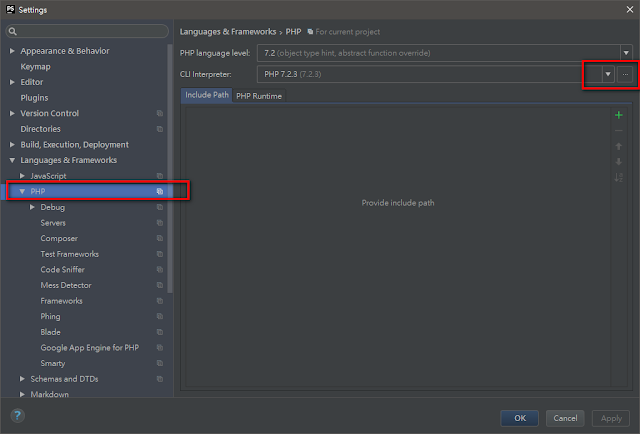
1. 先確定 PhpStorm的設定
Files ==> Settings ==> Languages & Frameworks ==> PHP
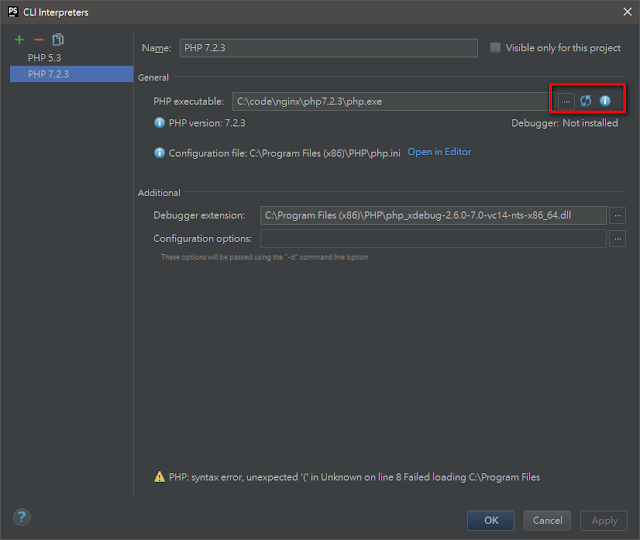
確定CLI interpreter 設定
可點進去確認
裡面也可以設定xdebug


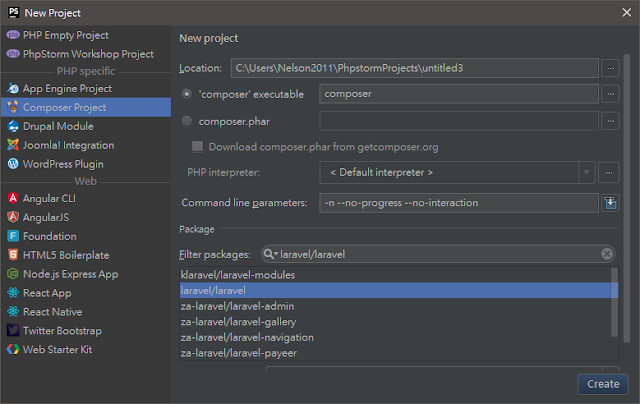
2. 新增專案
File ==> New Project ==> Composer Project ==> Filter package 找到 laravel/laravel
然後改 Location的名稱後,就可以按下create了

之後可以加入 GIT
啟動Server 方式
直接點選 index.php 滑鼠右鍵,Run index.php
或是在nginx 上面啟動
依照正常的nginx啟動 php方式啟動,但是記得要在設定檔修改路徑成為你要啟動的 Laravel 的public 資料夾 (預設的 index.php)
例如:
root C:\Users\XXXXXX\PhpstormProjects\Laravel01\public;
然後就可以正常啟動囉.......
2018年3月17日 星期六
Nginx + PHP + Windows
=======================
PHP5
OS: Windows 10 Home
download nginx (windows)
https://nginx.org/en/download.html
download php5 (stable)
https://windows.php.net/download#php-5.6
Key: 如何連結 nginx 與 php5 ?
Php5 : 利用 php-cgi.exe 執行以下命令
php-cgi -b 9000
nginx: 設定檔修改 /conf/nginx.conf
1. 將以下的code 前面的 # 移除,使他們不再是註解
2. 修改 fastcgi_param 參數中的 /scripts 改為 $document_root
location ~ \.php$ {
root html;
fastcgi_pass 127.0.0.1:9000;
fastcgi_index index.php;
fastcgi_param SCRIPT_FILENAME $document_root$fastcgi_script_name;
include fastcgi_params;
}
在nginx.exe 目錄下執行以下命令 例如C:\code\nginx\nginx-1.12.2
start nginx
如果要重讀取設定檔
nginx -s reload
如果要停止server
nginx -s stop
參考
http://nginx.org/en/docs/windows.html
=======================
PHP7
download php7 (stable)
https://windows.php.net/download#php-7.2
如上
=======================
可能問題
nginx 可能多重啟動,所以不能確定是跑那一個!?

砍光,重啟才能確定。
2018年2月23日 星期五
CentOS Linux HOW to install sublime 3 如何安裝
Time: 2018/2/24
===================================
$ cd ~/Downloads
===================================
下載檔案
## On 32bit
$ wget https://download.sublimetext.com/sublime_text_3_build_3143_x32.tar.bz2
## On 64bit
$ wget https://download.sublimetext.com/sublime_text_3_build_3143_x64.tar.bz2
===================================
## On 32bit
$ sudo tar -vxjf sublime_text_3_build_3143_x32.tar.bz2 -C /opt
## On 64bit
$ sudo tar -vxjf sublime_text_3_build_3143_x64.tar.bz2 -C /opt
===================================
===================================
以下內容放入剛剛開啟的檔案
===================================
安裝套件
https://packagecontrol.io/installation

將以下內容執行後,就可以開始安裝套件
-------------------------------------------------------------------
import urllib.request,os,hashlib; h = '6f4c264a24d933ce70df5dedcf1dcaee' + 'ebe013ee18cced0ef93d5f746d80ef60'; pf = 'Package Control.sublime-package'; ipp = sublime.installed_packages_path(); urllib.request.install_opener( urllib.request.build_opener( urllib.request.ProxyHandler()) ); by = urllib.request.urlopen( 'http://packagecontrol.io/' + pf.replace(' ', '%20')).read(); dh = hashlib.sha256(by).hexdigest(); print('Error validating download (got %s instead of %s), please try manual install' % (dh, h)) if dh != h else open(os.path.join( ipp, pf), 'wb' ).write(by)
完成安裝後, Ctrl + Shift + P 然後輸入 install 選擇 Package Control: Install Package 後
就可以開始安裝套件
===================================
進入Downloads目錄,準備下載
$ cd ~/Downloads
===================================
下載檔案
## On 32bit
$ wget https://download.sublimetext.com/sublime_text_3_build_3143_x32.tar.bz2
## On 64bit
$ wget https://download.sublimetext.com/sublime_text_3_build_3143_x64.tar.bz2
===================================
解壓縮到指定目錄
$ sudo tar -vxjf sublime_text_3_build_3143_x32.tar.bz2 -C /opt
## On 64bit
$ sudo tar -vxjf sublime_text_3_build_3143_x64.tar.bz2 -C /opt
設定指令(sublime3)與檔案的連結( /usr/bin/sublime3 前面有空格)
# sudo ln -s /opt/sublime_text_3/sublime_text /usr/bin/sublime3
===================================
可以執行了....
$ sublime3
===================================
設為桌面?
$ sudo sublime3 /usr/share/applications/sublime3.desktop
===================================
以下內容放入剛剛開啟的檔案
[Desktop Entry]
Name=Sublime3
Exec=sublime3
Terminal=false
Icon=/opt/sublime_text_3/Icon/48x48/sublime-text.png
Type=Application
Categories=TextEditor;IDE;Development
X-Ayatana-Desktop-Shortcuts=NewWindow
[NewWindow Shortcut Group]
Name=New Window
Exec=sublime -n
TargetEnvironment=Unity
===================================
安裝套件
https://packagecontrol.io/installation

將以下內容執行後,就可以開始安裝套件
-------------------------------------------------------------------
import urllib.request,os,hashlib; h = '6f4c264a24d933ce70df5dedcf1dcaee' + 'ebe013ee18cced0ef93d5f746d80ef60'; pf = 'Package Control.sublime-package'; ipp = sublime.installed_packages_path(); urllib.request.install_opener( urllib.request.build_opener( urllib.request.ProxyHandler()) ); by = urllib.request.urlopen( 'http://packagecontrol.io/' + pf.replace(' ', '%20')).read(); dh = hashlib.sha256(by).hexdigest(); print('Error validating download (got %s instead of %s), please try manual install' % (dh, h)) if dh != h else open(os.path.join( ipp, pf), 'wb' ).write(by)
-------------------------------------------------------------------
就可以開始安裝套件
===================================
推薦套件
git
emmet
Alignment
GitGutter
ColorPicker
SublimeLinter
git
emmet
Alignment
GitGutter
ColorPicker
SublimeLinter
===================================
參考:
訂閱:
意見 (Atom)

